

PIM Manager documentation · Verified against PIM Manager 3.0.23.3 on Nov 3, 2026
PIM Activator
Just-in-time access only works if activating it is quick. In the Microsoft Entra portal an admin activates one role at a time, and an admin with twenty eligible roles gives up and asks for standing access. The PIM Activator is a browser extension for Microsoft Edge and Google Chrome that activates everything an admin is eligible for from one popup.
What it does
- Lists what you are eligible for. Direct Entra roles, direct Azure roles, groups that carry Entra roles, groups that carry Azure roles, and workload groups (Defender XDR, Intune, Power BI and others), each in its own section. Show roles on a row shows the real permissions behind a group, including what folds out through nested groups.
- Activates in bulk. Tick the rows you need, enter a justification and a duration, and press Activate selected. Each row shows its own status.
- Asks again for a large selection. When you select at least the confirm threshold of roles (5 by default), Activate asks for a second click. Your administrator sets the threshold per device or per tenant.
- Auto-activation, with a cap. You can mark a group auto so it is activated when you open the popup. Your administrator sets how many groups a device may mark auto:
0turns auto-activation off, a number allows at most that many, and no value means no limit, so set a cap that fits your tenant. A permission group nested in a role group is activated as soon as its parent is active. - Honors the policy’s maximum duration. The duration box starts at your organization’s default (8 hours unless your administrator sets another). If a role’s PIM policy allows less, the extension reads that role’s maximum, activates it for the maximum and tells you. If the maximum cannot be read, it says so and names the duration it tried.
- Reports done only when the access is there. It keeps checking until the role is really assigned to you, so a slow activation is shown as still in progress, not as done.
- My Access shows what is active at the moment, with the time left, and deactivates one row or many.
- Waits for approval honestly. A group that needs an approver shows waiting for approval, not failed.
What it can and cannot do. The extension acts as the signed-in admin, through the delegated permissions of the PIM Activator app registration. It can only activate what that person is already eligible for; the app grants nobody any access. Sign-in tokens are kept in the browser’s memory for the browser session, not on disk. It talks only to Microsoft sign-in, Microsoft Graph, Azure Resource Manager and its own update feed.
Ways to activate
The PIM Activator is one of three ways to activate. All three act on the same eligibilities and follow the same PIM policies:
| Where | What the admin does | Good for |
|---|---|---|
| PIM Activator | Opens the popup, ticks the rows and presses Activate selected: three clicks for a typical activation. A starred favorite with a remembered justification takes a single click on later days. Multifactor authentication and approval still apply where the policy requires them. | Daily work with several groups and roles at once |
| Microsoft Entra admin center | ID Governance > Privileged Identity Management > My roles, then the Microsoft Entra roles, Groups or Azure resources tab, and Activate on each row. | A single activation, or a device without the extension |
| My Access | Signs in to the Microsoft My Access portal and activates an eligible group membership there. | Group activations from any browser |
With nested groups, the admin activates the role group first and then the permission groups nested in it; see Nested groups. The step-by-step for admins is How to activate.
Permissions it uses
The PIM Activator app registration holds these delegated permissions, with tenant-wide admin consent so admins see no consent prompt. A delegated permission acts only with the signed-in admin’s own rights.
| API | Permission | Purpose |
|---|---|---|
| Microsoft Graph | PrivilegedAccess.ReadWrite.AzureADGroup |
Activate and deactivate PIM for Groups memberships |
| Microsoft Graph | RoleManagement.ReadWrite.Directory |
Activate and deactivate Entra roles held directly. This permission is wider than self-activation needs (RoleAssignmentSchedule.ReadWrite.Directory would do); because it is delegated, it acts only with the signed-in admin’s own rights |
| Microsoft Graph | RoleManagement.Read.Directory, Group.Read.All, AdministrativeUnit.Read.All |
Show the roles behind a group and name the groups and units |
| Microsoft Graph | User.Read |
Identify the signed-in admin |
| Microsoft Graph | Application.Read.All |
Registered and consented by the setup script, but not used by the popup. Your consent covers a permission the extension does not use; it lets a signed-in admin read the app registrations their own rights allow |
| Azure Service Management | user_impersonation |
Activate Azure role eligibilities |
Updates of the extension
The browser installs the extension and its updates from the update address in your policy, which by default is Invardia’s public update feed; you can host your own copy with -UpdateUrl. Each package is signed with the extension’s own key, which fixes the extension id, and the browser installs an update only when the signature matches that id. The policy also sets a minimum version.
Deploy it
The Operations > Client onboarding page guides you through five steps and fills in every command for your environment. The page writes nothing to your tenant: each step gives you the command to run.
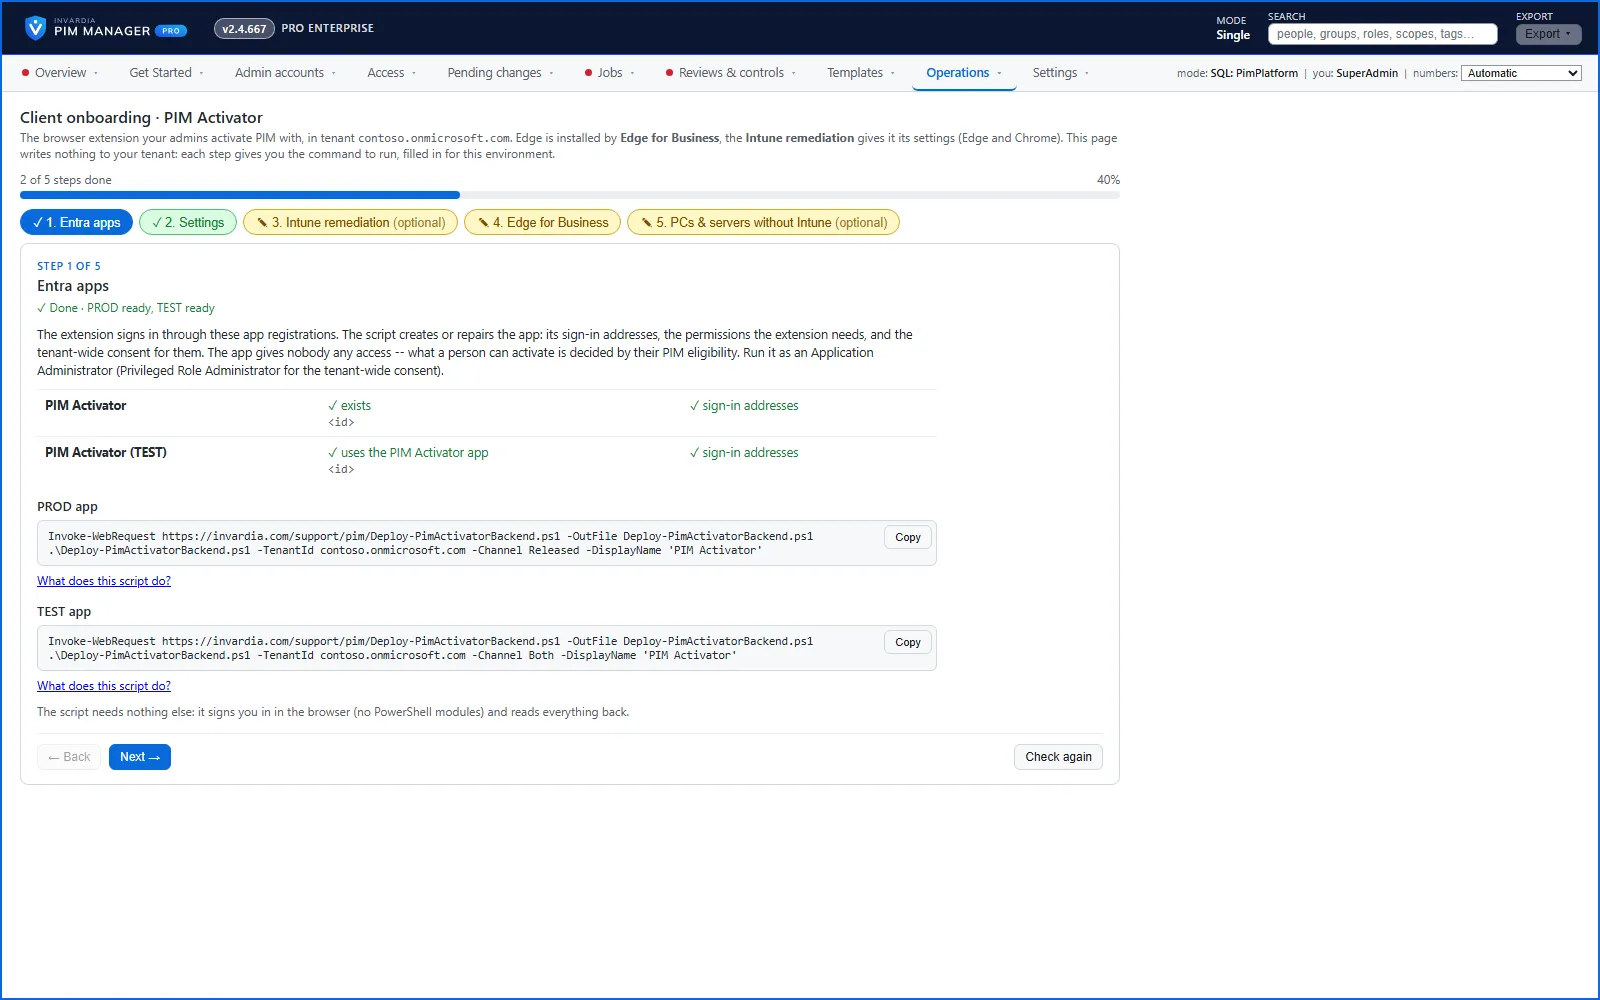
| Step | What you do | Who |
|---|---|---|
| 1. Entra apps | Create the PIM Activator app registration with its sign-in addresses, permissions and tenant-wide consent | Application Administrator and Privileged Role Administrator |
| 2. Settings | Name shown to admins, app, default justification and duration, group prefix, auto-activation cap, confirm threshold, browsers, and more tenants for admins who work in several | Admin in PIM Manager |
| 3. Intune remediation | Upload the Remediation that writes these settings to devices | Intune Administrator |
| 4. Edge for Business | Force-install the extension through the Microsoft Edge management service | Edge Administrator or Global Administrator |
| 5. PCs and servers without Intune | Run one script per machine instead of steps 3 and 4 | Local administrator |
Step 1: the app registration
iwr https://invardia.com/support/pim/Deploy-PimActivatorBackend.ps1 -OutFile .\Deploy-PimActivatorBackend.ps1
.\Deploy-PimActivatorBackend.ps1
The script opens a browser sign-in, creates or repairs the app, grants tenant-wide consent and reads everything back. It needs no PowerShell modules. Details: Deploy-PimActivatorBackend.
Steps 3 and 4: with Intune and Edge for Business
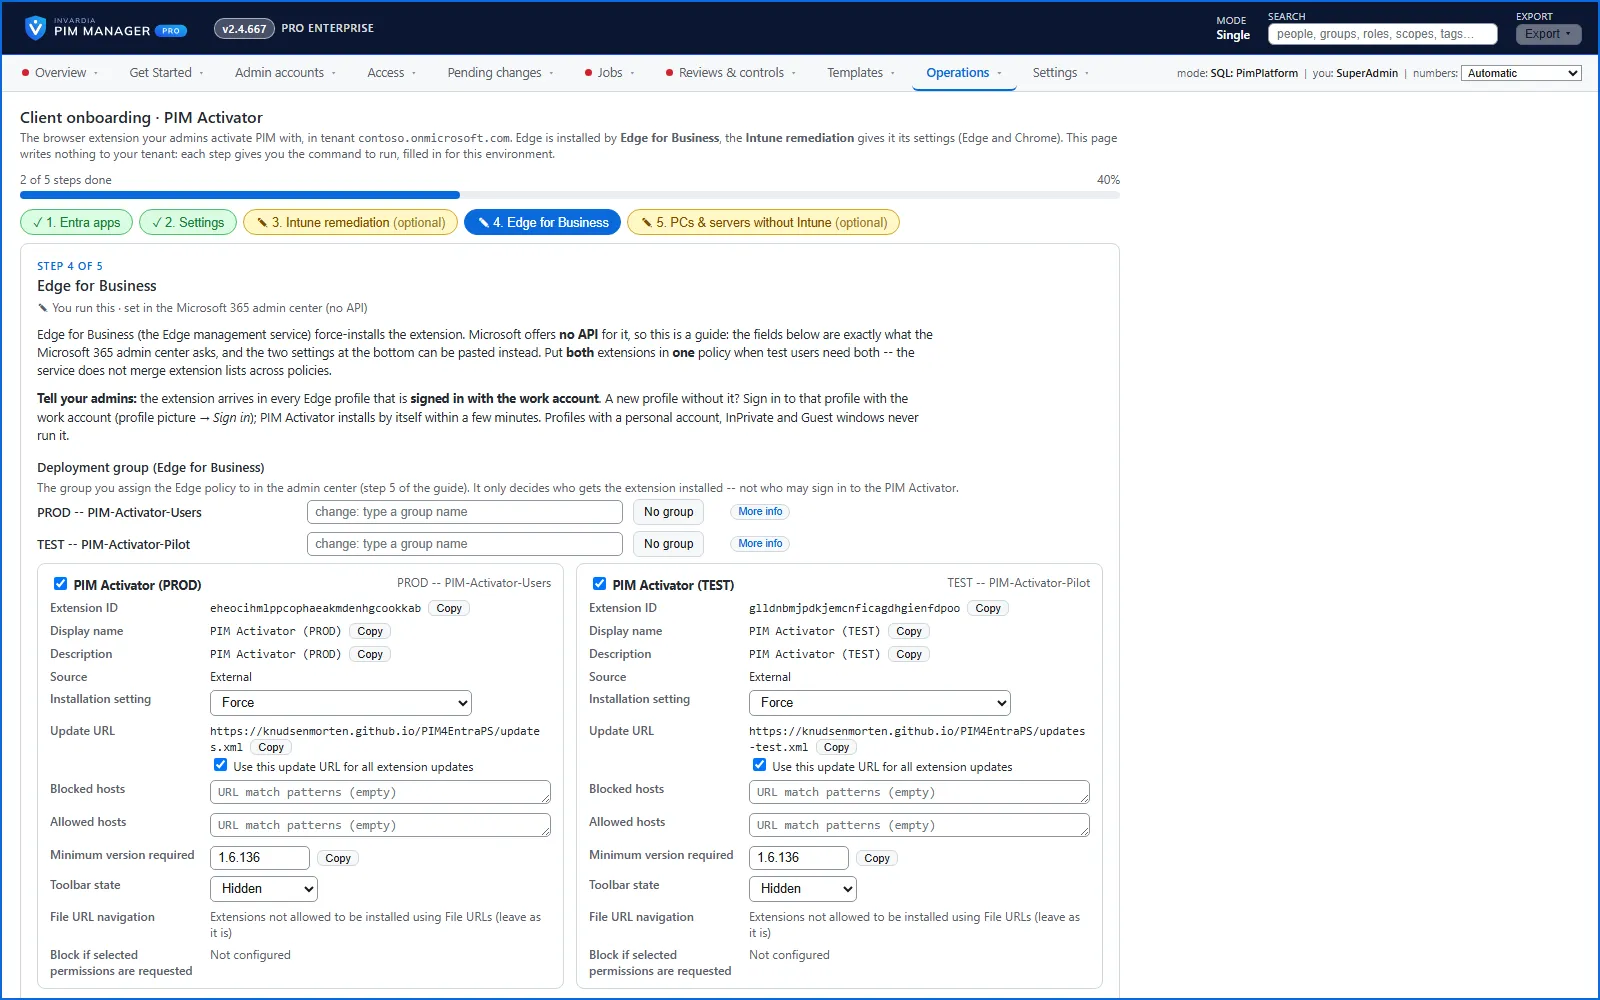
Edge for Business installs the extension. Microsoft offers no API for the Edge management service, so the page is a guide that mirrors the Microsoft 365 admin center (Settings > Microsoft Edge > Configuration policies). Create a Cloud policy, add the install source, add the extension with Installation setting = Force, its update URL, Use this update URL for all extension updates and the minimum version the page shows, and assign the policy to a group that holds the everyday work accounts of your administrators, the accounts their Edge profiles are signed in with, never to everyone. The group decides who gets the extension; what each person can activate still depends on their own PIM eligibilities. The page also gives the same values as settings you can paste.
The Edge management service does not merge extension lists across policies: an admin gets the extension list of the highest-priority policy assigned to them. If a group of admins needs other extensions too, put them and the PIM Activator in that one policy.
The Intune Remediation gives it its settings. It writes the tenant catalog, the auto-activation cap and the confirm threshold for Edge and Chrome, and writes the two limits with the same values for the released extension and for the second channel you may use to try updates on a few devices first. It does not install the extension. One command builds the detection and remediation scripts for your environment, uploads them, reads them back and assigns them to the group you chose on the page:
iwr https://invardia.com/support/pim/Publish-PimActivatorRemediation.ps1 -OutFile .\Publish-PimActivatorRemediation.ps1
.\Publish-PimActivatorRemediation.ps1 -TenantId <tenant id> -ClientId <app id> -AutoActivateMaxGroups 3 -BulkActivateConfirmThreshold 5 -AssignToGroupId <group id> -EveryHours 1
The page shows this command with your values filled in. Run it as an Intune Administrator; it signs you in in the browser. Running it again updates the Remediation in place. You can also download the two scripts from the page and create the Remediation by hand (run as SYSTEM, 64-bit PowerShell). Intune Remediations need a Windows Enterprise E3 or E5 license or equivalent. Details: Publish-PimActivatorRemediation.
Step 5: without Intune
On a PC or server that Intune does not manage, run one script as administrator. It writes the install policy and the same settings as Edge for Business plus the Remediation, for Edge and Chrome, for everyone who uses that machine, with the same auto-activation cap and confirm threshold for both extension channels:
iwr https://invardia.com/support/pim/Deploy-PimActivatorClient.ps1 -OutFile .\Deploy-PimActivatorClient.ps1
.\Deploy-PimActivatorClient.ps1 -TenantId <tenant id> -ClientId <app id> -TenantName 'Contoso' -AutoActivateMaxGroups 3 -BulkActivateConfirmThreshold 5 -Prefix 'PIM-'
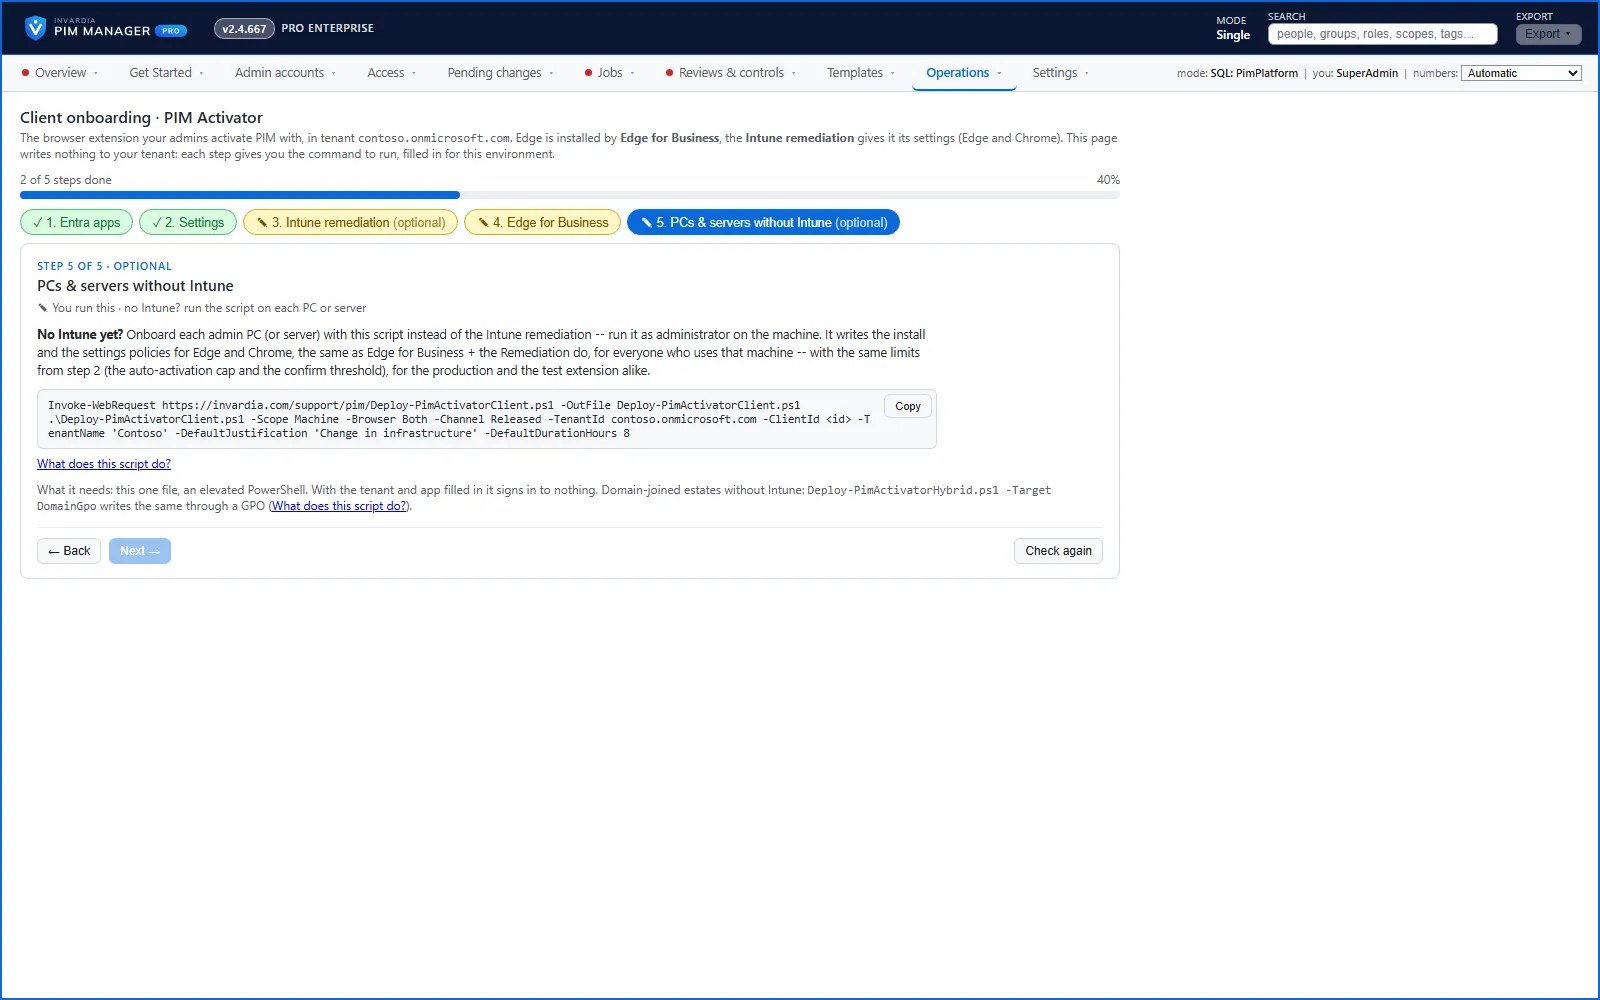
With the tenant and app given, it signs in to nothing. It keeps your organization’s own extension policies and adds only its own rows. -WhatIf shows every value it would write; -Uninstall removes only what it wrote. Details: Deploy-PimActivatorClient.
For a domain without Intune, Deploy-PimActivatorHybrid.ps1 -Target DomainGpo writes the same through a Group Policy Object. Details: Deploy-PimActivatorHybrid.
New Edge profiles
Edge for Business installs the extension in every Edge profile that is signed in with the work account. If a new profile has no PIM Activator, sign in to that profile with the work account (profile picture > Sign in); the extension installs by itself within a few minutes. A profile with a personal account, an InPrivate window and a Guest window do not run the extension.
First use
The first time an admin opens the popup, it offers the centrally deployed tenant catalog (with a picker when there are several tenants). The admin signs in with a normal Microsoft sign-in window, and the popup opens on the Activate tab from then on. See How to activate with the PIM Activator.
Verified against PIM Manager 3.0.23.3 on Nov 3, 2026Download PDF