

PIM Manager documentation · Verified against PIM Manager 3.0.23.3 on Nov 3, 2026
How to set up PIM for Active Directory
Entra ID PIM makes cloud access just-in-time, but the members of your on-premises AD admin groups stay standing. This guide installs the hybrid worker, so that activating a PIM group in the cloud gives the matching AD admin account a time-limited membership of the matching AD group.
Available in Pro editions; not in Community.
For how the worker works and what it may change, read Hybrid Active Directory first.
What you need
- In PIM Manager: the SuperAdmin role, to switch the feature on and save the hybrid settings.
- In Azure, for the person who runs the deploy:
- Contributor (or Owner) on the subscription or the worker’s resource group. For an Azure VM, also Network Contributor on the networks it peers with. For your own Arc-enabled server, Reader and Azure Connected Machine Resource Administrator on that machine.
- User Access Administrator (or Role Based Access Control Administrator) on the storage container that holds the PIM code.
- Privileged Role Administrator in Entra ID, to grant the worker’s identity its read permissions.
- Entra admin of the PIM SQL server (or a member of its admin group).
- In Active Directory: a Domain Admins member for the AD step, on a domain controller. Enterprise Admins only when the forest has no KDS root key yet.
- The machine: either an Azure VM that the deploy builds (
-Target Azure, peered to the network of your domain controllers), or your own domain-joined Windows server that is Azure Arc-enabled (-Target Arc). - The OUs you use: one for the worker’s computer account, one for the gMSAs and their groups, and one where PIM for AD creates its groups.
Step 1: see the plan
Run the deploy without -Apply. It prints every step, what it would create or grant, and the exact command for the AD step. Nothing is changed.
iwr https://invardia.com/support/pim/Deploy-PimHybridWorker.ps1 -OutFile .\Deploy-PimHybridWorker.ps1
.\Deploy-PimHybridWorker.ps1 -Target Azure -SubscriptionId <subscription id> -TenantId <tenant id> -SqlServerId <PIM SQL server resource id> -SourceContainerId <PIM code container resource id> -PeerVnetId <domain controller network resource id> -DnsServers <domain controller addresses> -AdDomain <NetBIOS name> -ComputerOu '<OU for the worker>' -GmsaOu '<OU for the gMSAs>' -GroupsOu '<OU for PIM groups>'
For your own Arc-enabled server, use -Target Arc -ArcMachineResourceId <machine resource id> instead of -PeerVnetId and -DnsServers. Every parameter is described on the Deploy-PimHybridWorker page.
To watch the worker before it writes anything, add -PlanOnly: every run then plans and logs, and nothing is written to AD until the worker’s configure step runs again without it.
Step 2: run it
- Run the same command with
-Apply. With-Target Azureit builds the VM without a public IP address, its network, the NAT gateway for outbound traffic and the peering. - The deploy stops at the Active Directory step and prints a command.
Step 3: prepare Active Directory
Your AD administrator runs the printed Initialize-PimHybridWorkerAd command on a domain controller. It creates the gMSAs, their permission groups, the rights on the OUs you named and, for server onboarding, the servers GPO.
When it has to create a KDS root key, gMSAs can use that key after about 10 hours. The deploy waits for it.
Step 4: finish the deploy
Run the deploy again with -Resume -Apply. It remembers every value from the first run. It grants the worker’s identity its read access and installs the worker through Azure run-command, so no inbound port is opened.
Step 5: switch the feature on
- Open Settings > Settings and choose the category Features & edition.
- In the Feature customization card, under Governance, tick Enabled for On-premises Active Directory (hybrid worker).
- Press Save feature customization.
The feature is off by default. While it is off, the worker’s jobs do not run.
Step 6: set the names
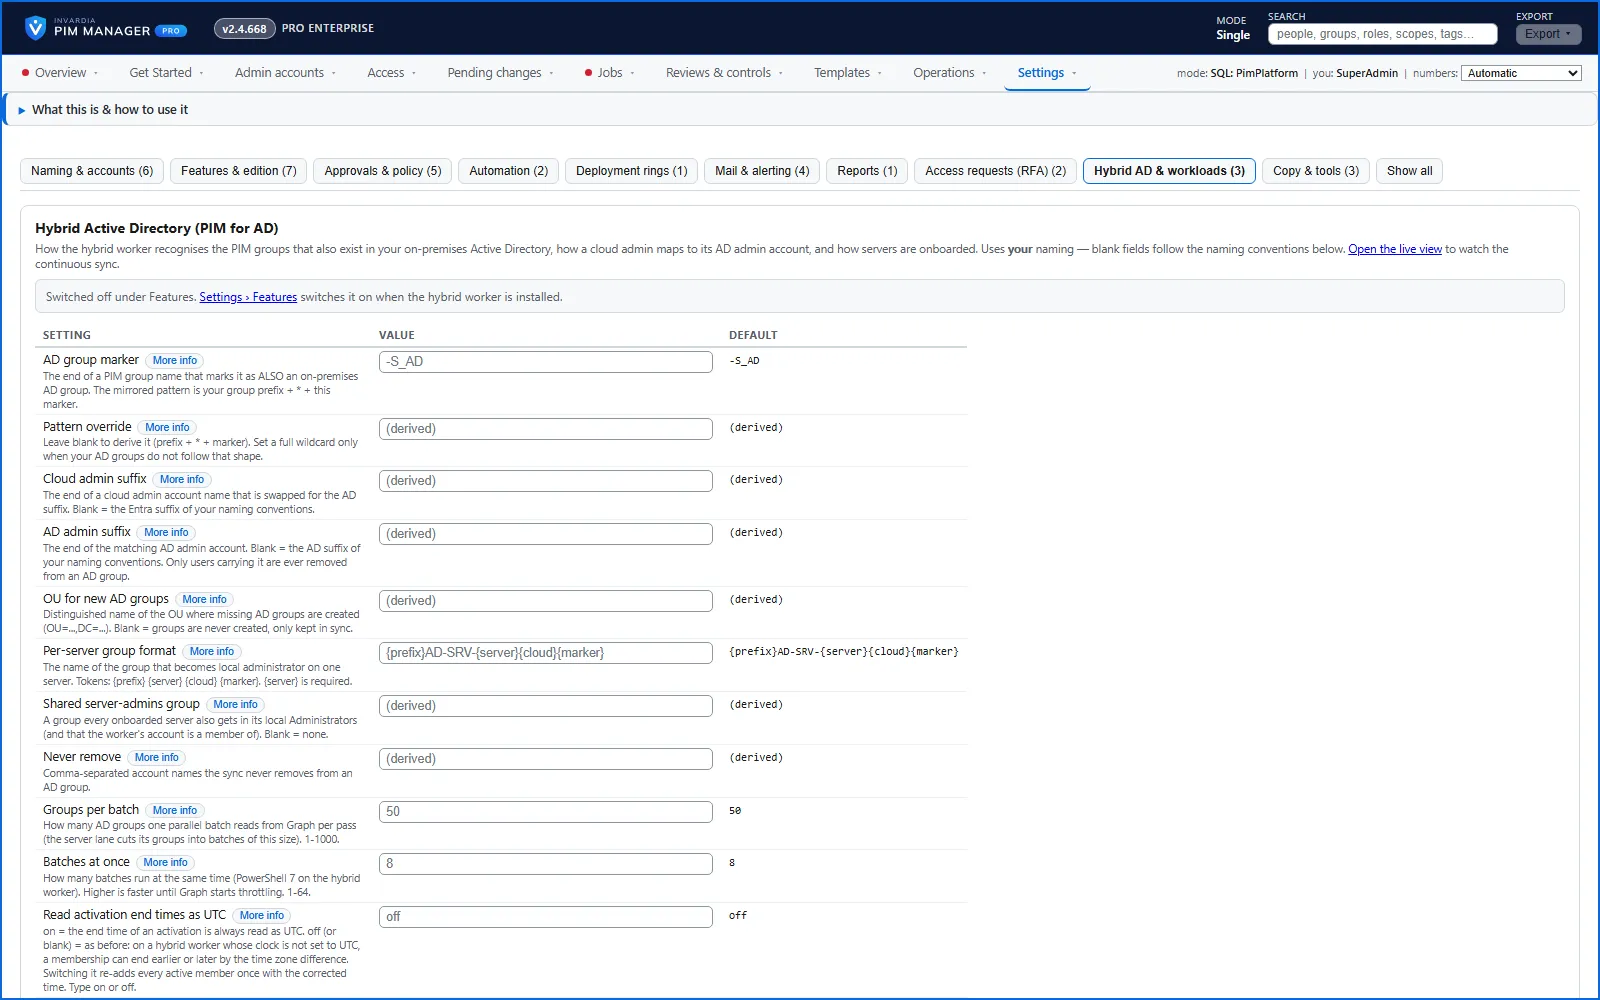
- On Settings, choose the category Hybrid AD & workloads. The card is Hybrid Active Directory (PIM for AD).
- Fill in the values. Blank fields follow your naming conventions.
- AD group marker: the end of a PIM group name that marks the group as an AD group as well.
- Cloud admin suffix and AD admin suffix: how a cloud admin account name maps to its AD admin account.
- OU for new AD groups: where missing AD groups are created. Blank means the worker creates no groups and only keeps existing ones in sync.
- Per-server group format and Shared server-admins group: the groups that become local administrators on your servers.
- Never remove: accounts the sync never removes from an AD group.
- Read the preview under the table: Mirrored to AD shows the group name pattern and how many PIM groups match it; Account mapping shows an example cloud admin and its AD admin account; Server group shows an example server group.
- Press Save hybrid settings.
Step 7: create the AD admin accounts
An AD admin account is created like any other admin account, with Active Directory as its environment.
- Open Admin accounts > Admin accounts & TAP and press + New admin.
- On Purpose & platform, set Environment to Active Directory (on-prem).
- Finish the wizard, then commit under Pending changes. The worker creates the account in AD with the name your naming settings produce.
Check the result
- The Hybrid Active Directory (PIM for AD) card shows Hybrid worker is working, with one green marker per worker job: Critical group sync, Server group sync, Change detection, Apply changes, Group definitions and Server onboarding. A marker that says plan-only means the worker plans and writes nothing.
- Open the live view on the same card opens PIM for AD — live sync: per group, the current and expected membership, and every add and remove as it happens.
- Activate a mirrored PIM group as an admin who is eligible for it. The matching AD admin account appears in the AD group and leaves it when the activation ends.
Undo
- Stop the jobs: clear Enabled for On-premises Active Directory (hybrid worker) and save. The worker’s jobs no longer run.
- Cut the Azure VM off at once: Set-PimHybridWorkerPeering
-State Disconnected. Its AD jobs then fail visibly;-State Connectedrestores them. - Remove the worker: Remove-PimHybridWorker shows its plan first and, with
-Apply, removes what the worker scripts created in Azure, the PIM database and on the worker machine. It never changes Active Directory: it prints the AD clean-up (the gMSAs, their groups, their rights and the servers GPO) for your AD administrator.
Related pages
Verified against PIM Manager 3.0.23.3 on Nov 3, 2026Download PDF
← How to install the PIM Activator without IntuneHow to read the access map and see who can activate a role →