

PIM Manager documentation · Verified against PIM Manager 3.0.23.3 on Nov 3, 2026
How to install the PIM Activator without Intune
Without Intune there is no Remediation to give the PIM Activator its settings, and Edge for Business has no field for the tenant the extension signs in to. Deploy-PimActivatorClient.ps1 does both on one machine: it writes the browser’s install policy and the extension’s settings into that machine’s registry, with the same settings the Intune Remediation writes.
What it writes
On the machine where you run it, for Edge, Chrome or both:
- The install policy: the browser installs the PIM Activator and keeps it updated from its published update address. Your organization’s own extension policies are kept: the script adds its own row and merges its own entry.
- The tenant catalog: your tenant, the PIM Activator app, the default justification and activation length, and the name filters.
- The limits: the auto-activation cap and the bulk-activation confirm threshold, written for both PIM Activator channels (the released extension and the TEST channel, a second extension you can use to try an update on a few machines first), exactly as the Intune Remediation writes them.
With the tenant and the app filled in, as in the command PIM Manager shows, the script signs in to nothing and calls no service. Afterwards the browser downloads the signed extension package from the update address.
What you need
- The Admin role in PIM Manager, to open Operations > Client onboarding and fill in the settings.
- The PIM Activator app exists: step 1. Entra apps on the same page shows it as done.
- On each machine: an elevated PowerShell (local Administrator). With
-Scope Userthe script writes for the current user only and needs no elevation.
Step 1: fill in the settings
- Open Operations > Client onboarding. The page Client onboarding · PIM Activator shows five steps: 1. Entra apps, 2. Settings, 3. Intune remediation (optional), 4. Edge for Business and 5. PCs & servers without Intune (optional).
- Open 2. Settings and check the values. They are filled in from your environment:
- Channel: keep PROD (released). The other choice, TEST, installs the second extension.
- Name shown to admins: the tenant name the extension shows.
- App (client id): the PIM Activator app.
- Default justification and Default duration (hours): what the extension fills in on the activation form.
- Group prefix: optional; the extension lists only groups whose names start with this text.
- Auto-activate at most: the most groups the extension auto-activates on this machine. Leave it empty to leave the machine’s current value alone.
- Confirm when selecting: from how many selected items a bulk activation asks for a second click. Leave it empty to leave the machine’s current value alone.
- Browsers: Edge, Chrome or both.
- For admins who work in several tenants, fill in More tenants (optional) and press Save the tenants.
Step 2: copy the command
- Open 5. PCs & servers without Intune. It shows a two-line command with your values: the first line downloads the script, the second runs it.
- Press Copy.
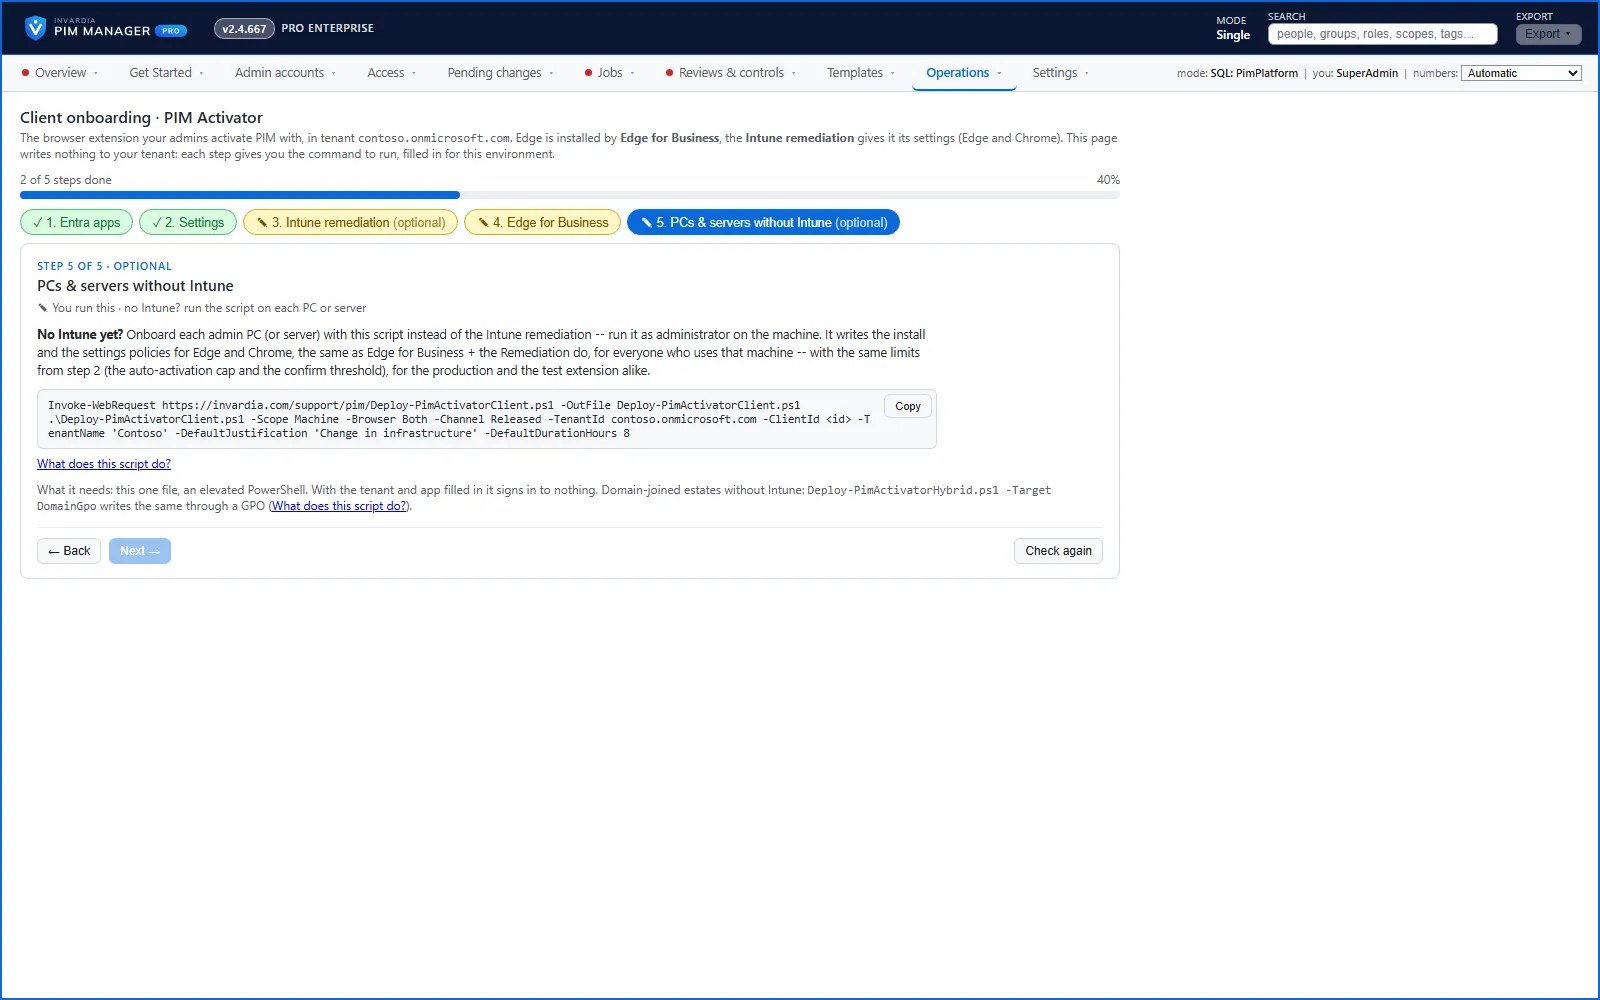
The command looks like this:
iwr https://invardia.com/support/pim/Deploy-PimActivatorClient.ps1 -OutFile .\Deploy-PimActivatorClient.ps1
.\Deploy-PimActivatorClient.ps1 -Scope Machine -Browser Both -Channel Released -TenantId <tenant id> -ClientId <app id> -TenantName 'Contoso' -DefaultJustification 'Change in infrastructure' -DefaultDurationHours 8 -Prefix 'PIM-' -AutoActivateMaxGroups 3 -BulkActivateConfirmThreshold 5
The Settings step has one name filter, Group prefix (-Prefix). To list only Entra roles or Azure roles whose names start with a given text, add -EntraPrefix or -AzurePrefix to the run line yourself.
Step 3: run it on each machine
- On the machine, open PowerShell as administrator.
- Paste the download line, then the run line with
-WhatIfadded. The script prints every registry value it would set or remove, and writes nothing. - Run the run line again without
-WhatIf. - Restart the browser.
For domain-joined machines without Intune, Deploy-PimActivatorHybrid with -Target DomainGpo writes the same policies through a Group Policy Object instead of machine by machine.
The settings and their parameters
| Setting | Parameter | Values |
|---|---|---|
| Auto-activation cap | -AutoActivateMaxGroups |
0 = off, N = at most N groups, -1 = remove the cap. Left out: the machine keeps what it has. |
| Bulk-activation confirm threshold | -BulkActivateConfirmThreshold |
1 to 100, -1 = remove it. Left out: the machine keeps what it has. |
| Group name filter | -Prefix |
Only groups whose names start with this text. |
| Entra role name filter | -EntraPrefix |
Only Entra roles whose names start with this text. |
| Azure role name filter | -AzurePrefix |
Only Azure roles whose names start with this text. |
| Which extension | -Channel |
Released (the default) or Test. |
| Which browsers | -Browser |
Edge, Chrome or Both. |
| Who on the machine | -Scope |
Machine (every user, needs elevation) or User (current user only). |
The two limits apply to both channels on the machine, whichever -Channel you install. The name filters go into the tenant catalog, which the script writes when -TenantId and -ClientId are given.
To try an update on a few machines first, choose TEST under Channel in step 1 and run that command on those machines.
Check the result
- In Edge, open
edge://policyand press Reload policies. The extension policies list the PIM Activator. In Chrome, usechrome://policy. - Open
edge://extensions(orchrome://extensions). The PIM Activator is listed as installed. - Open the PIM Activator and sign in with the admin account. It shows your tenant under the name you set.
InPrivate and Guest windows never run extensions. An admin activates from a normal browser window.
Undo
Run the same command with -Uninstall, using the same -Scope, -Browser and -Channel:
iwr https://invardia.com/support/pim/Deploy-PimActivatorClient.ps1 -OutFile .\Deploy-PimActivatorClient.ps1
.\Deploy-PimActivatorClient.ps1 -Scope Machine -Browser Both -Channel Released -Uninstall
It removes only what the script wrote: its install rows, its extension settings entry and the tenant catalog. Your organization’s other extension policies stay. The browser removes the extension on its next start. To remove only one limit, run the script again with -AutoActivateMaxGroups -1 or -BulkActivateConfirmThreshold -1.
Related pages
Verified against PIM Manager 3.0.23.3 on Nov 3, 2026Download PDF
← How to add a break-glass accountHow to set up PIM for Active Directory →