

PIM Manager documentation · Verified against PIM Manager 3.0.23.3 on Nov 3, 2026
How to onboard an admin
An admin who does privileged work from their everyday account exposes that work to every mail and website they open. This guide creates a separate admin account, named by your naming convention, and gets the first sign-in to the person with a Temporary Access Pass (TAP).
For a consultant from another company, follow How to onboard a consultant. It uses the same wizard and adds the employer confirmation.
What you need
- The Admin role in PIM Manager.
- The person’s sponsoring department on Reviews & controls > Departments & owners, with at least one owner. The owners approve for the admin and receive its mail.
- The person’s everyday office mail address. The Temporary Access Pass is sent there.
- A mail sender for PIM Manager (set up under Get Started). PIM Manager delivers a Temporary Access Pass by mail only and does not show the code on any page.
- The Temporary Access Pass method switched on in your tenant’s authentication methods policy in Microsoft Entra ID. PIM Manager follows that policy: when it allows one-time passes only, the pass is one-time, and the lifetime is kept within the policy’s minimum and maximum.
How the name is built
The wizard builds the sign-in name from your naming convention and shows it live while you type, under You’ll get – UserName, You’ll get – UserPrincipalName and You’ll get – DisplayName. With the default convention:
| The admin is | Choose | Example name |
|---|---|---|
| A day-to-day admin in Entra ID | Purpose: Day-2-day admin, Environment: Entra ID | admin-jd-id |
| A day-to-day admin in on-premises AD | Environment: Active Directory | admin-jd-ad |
| A dedicated Tier-0 account | Purpose: High-priv dedicated | admin-jd-l0-t0-id |
| A consultant with a local account | Admin type: Consultant – local account in this tenant | x-admin-jd-id |
Admin account names are lower case. The admin type sets the prefix and the environment sets the suffix; both come from Settings > Naming & accounts. Read more in Naming.
Step 1: open the wizard
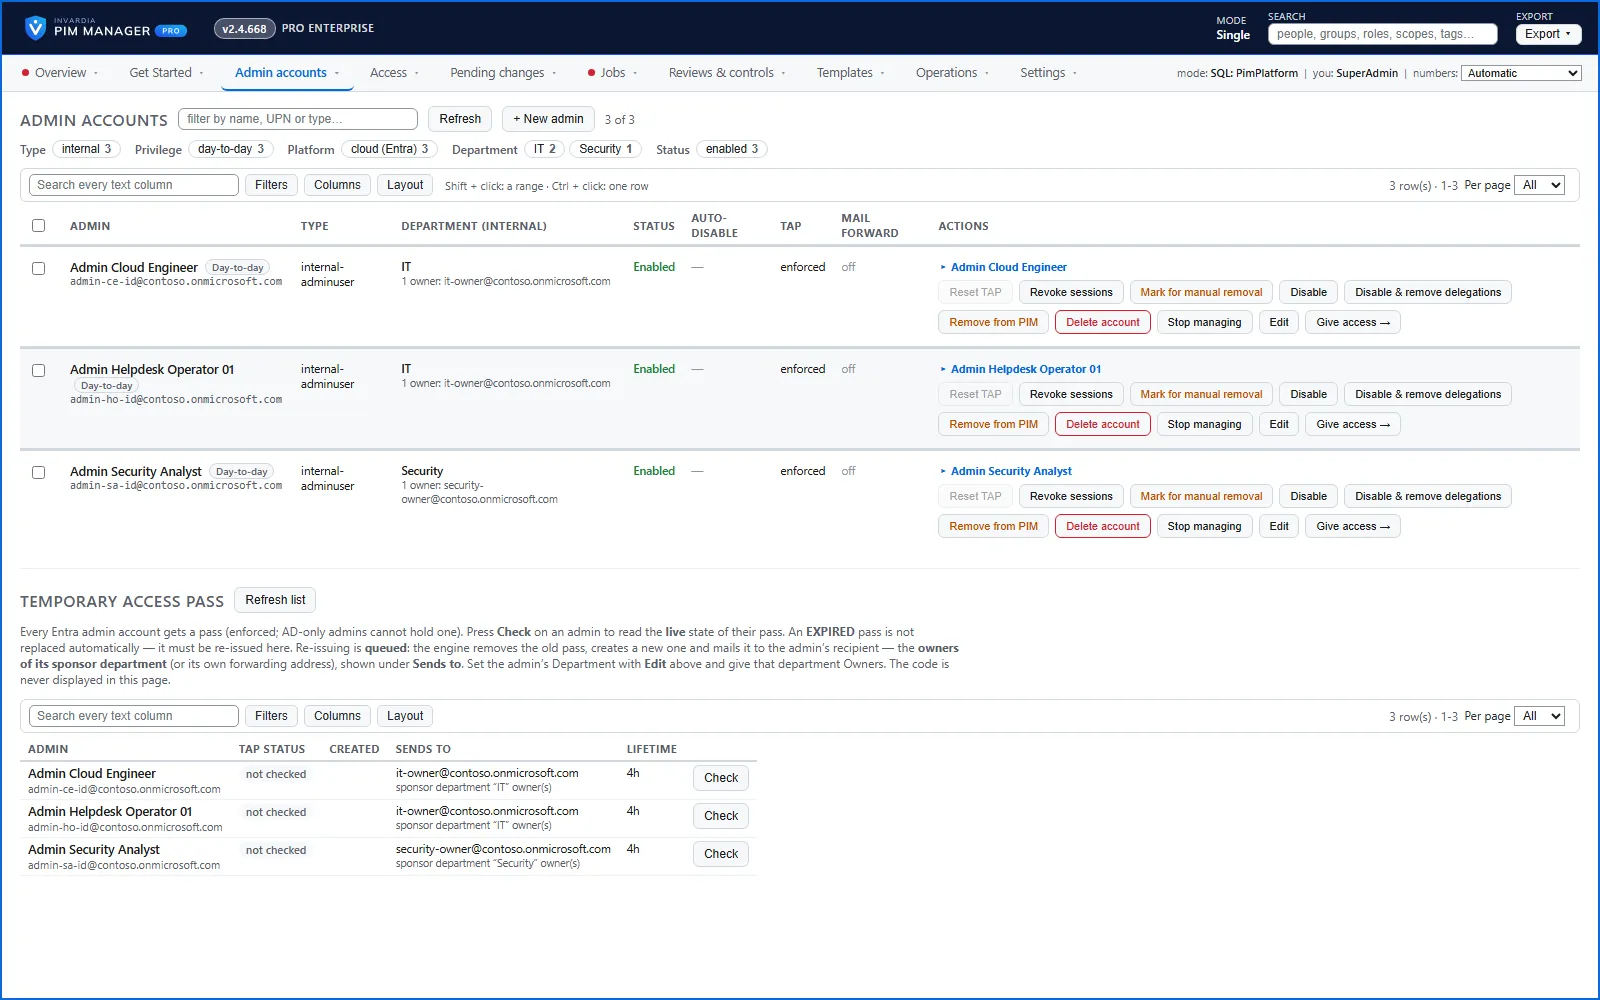
- Open Admin accounts > Admin accounts & TAP and press + New admin. You can also open Access > Create access and choose Create an admin account; it is the same wizard.
- The New admin account wizard opens. Its steps are Person, Purpose & platform, Activation, Lifecycle, Role groups and Review. Move between them with Next → and ← Back.
Step 2: the person
- Admin type: choose Internal admin for your own employee. The list shows the prefix each type gets.
- Start from template: shown only when admin templates exist. A template fills in tier, scheduling, TAP and forwarding; you can change every value afterward.
- First name and Last name.
- Initials (short code): 2-4 letters used in the sign-in name. It fills in from the name; type your own to override it.
- Department (internal): the department that sponsors this admin.
- UPN suffix: the domain after the @. It defaults to your tenant’s admin account domain.
- Press Next →.
Step 3: purpose and platform
- Purpose: keep Day-2-day admin – Admin-INI (default) for an account that holds many delegations over time. Choose High-priv dedicated – Admin-INI-L0-T0 only for a dedicated Tier-0 account; it sets level L0 and tier T0, and the name carries both.
- Environment: Entra ID (cloud) for a cloud account, or Active Directory (on-prem) for an account in your on-premises AD (see Hybrid Active Directory).
- On a managing tenant, this step also asks how the admin is managed across your managed tenants. Read more in MSP.
Step 4: when the account and the pass start
- Create on: keep Now (the next engine run), or choose a preset such as First workday next month, 07:00, or a date. Use a later date when the person’s normal mailbox does not exist yet.
- Under Where this admin’s mail goes, keep Forward mail to the owner’s office user? on Yes (recommended) and enter the person’s everyday address in Office user email address. Every mail PIM Manager sends about this admin goes there, including the pass.
- Under Temporary Access Pass schedule, set TAP valid from: Immediately (when the account is created), a preset such as First workday next month, 08:00, or a date. PIM Manager creates the pass close to that time, so the code is fresh when the person uses it.
- TAP lifetime (hours): from 1 to 720. Blank means 8 hours, capped at your tenant’s maximum.
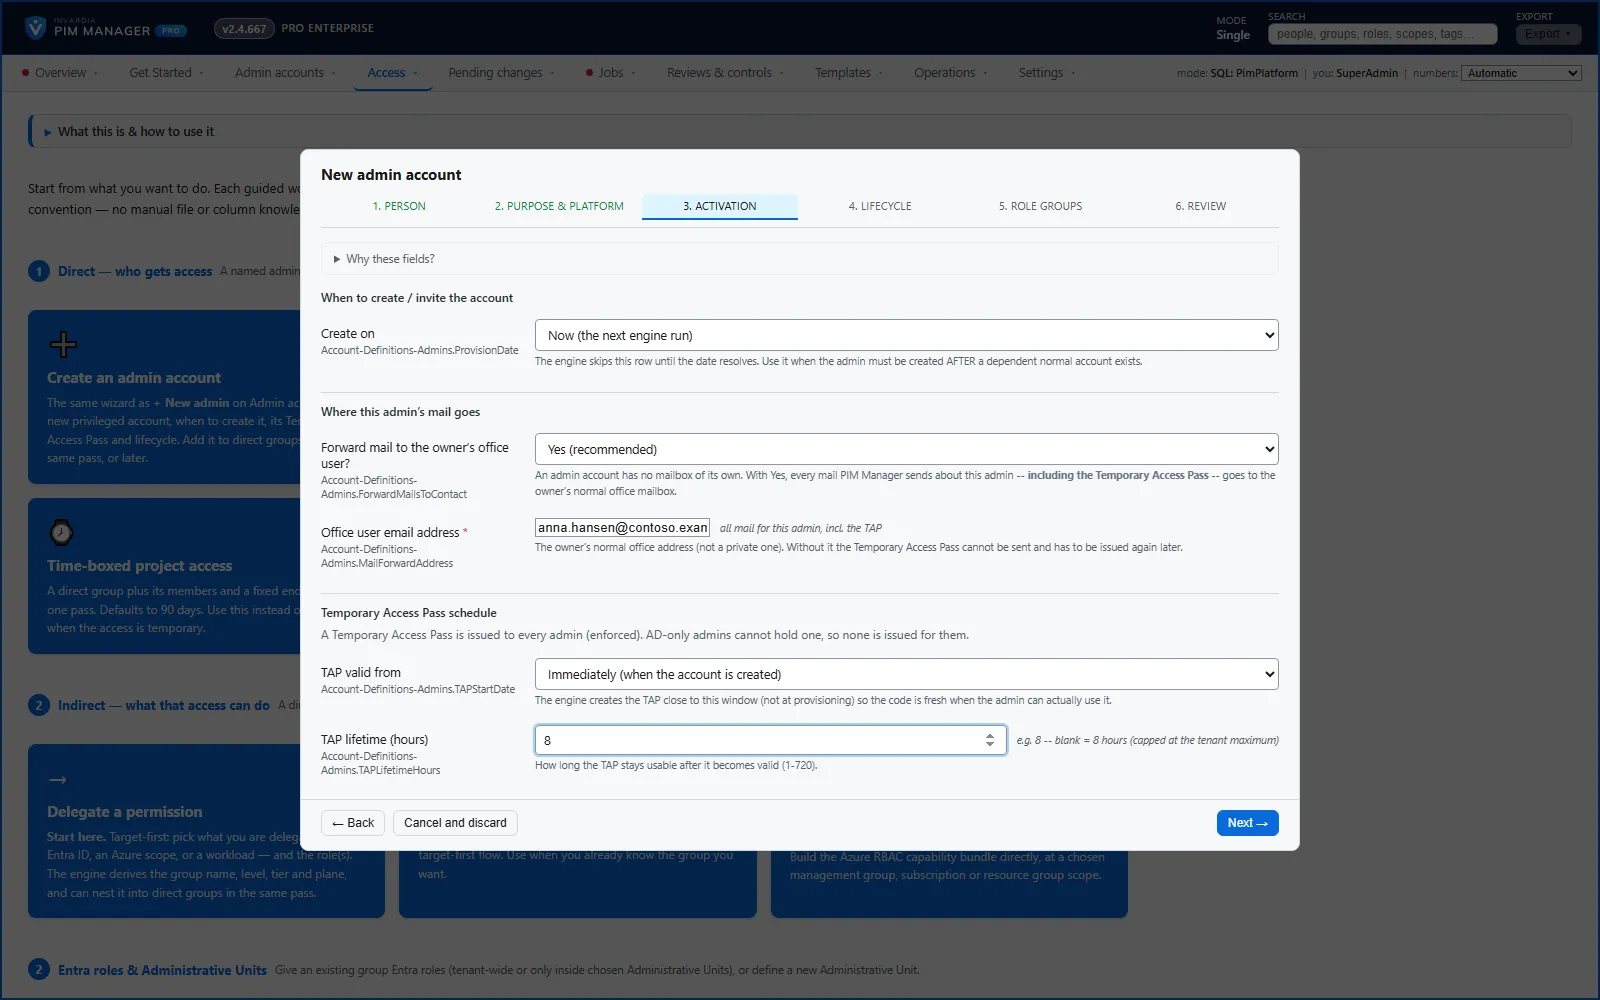
An account in on-premises AD only gets no Temporary Access Pass; a pass is an Entra ID sign-in method.
Step 5: lifecycle
- Status: keep Enabled (default – account works normally).
- User type (from Admin type) is set by the admin type and cannot be changed here.
- Usage location: the country used when licenses are assigned.
Step 6: role groups
- Pick the role groups the admin needs. You can skip this and give access later with Give access → on the admin’s row.
- Assignment type: keep Eligible (default – must activate via PIM).
- Lifetime (days): how long the memberships last before they must be renewed. The default is 365; 0 means permanent and is not recommended.
Step 7: review and stage
- On Review, check the sign-in name. If the name is taken, a red line names the account that holds it: go back to Person and change the initials, for example add a third letter.
- Press Add to pending changes. Nothing is created yet.
Step 8: commit
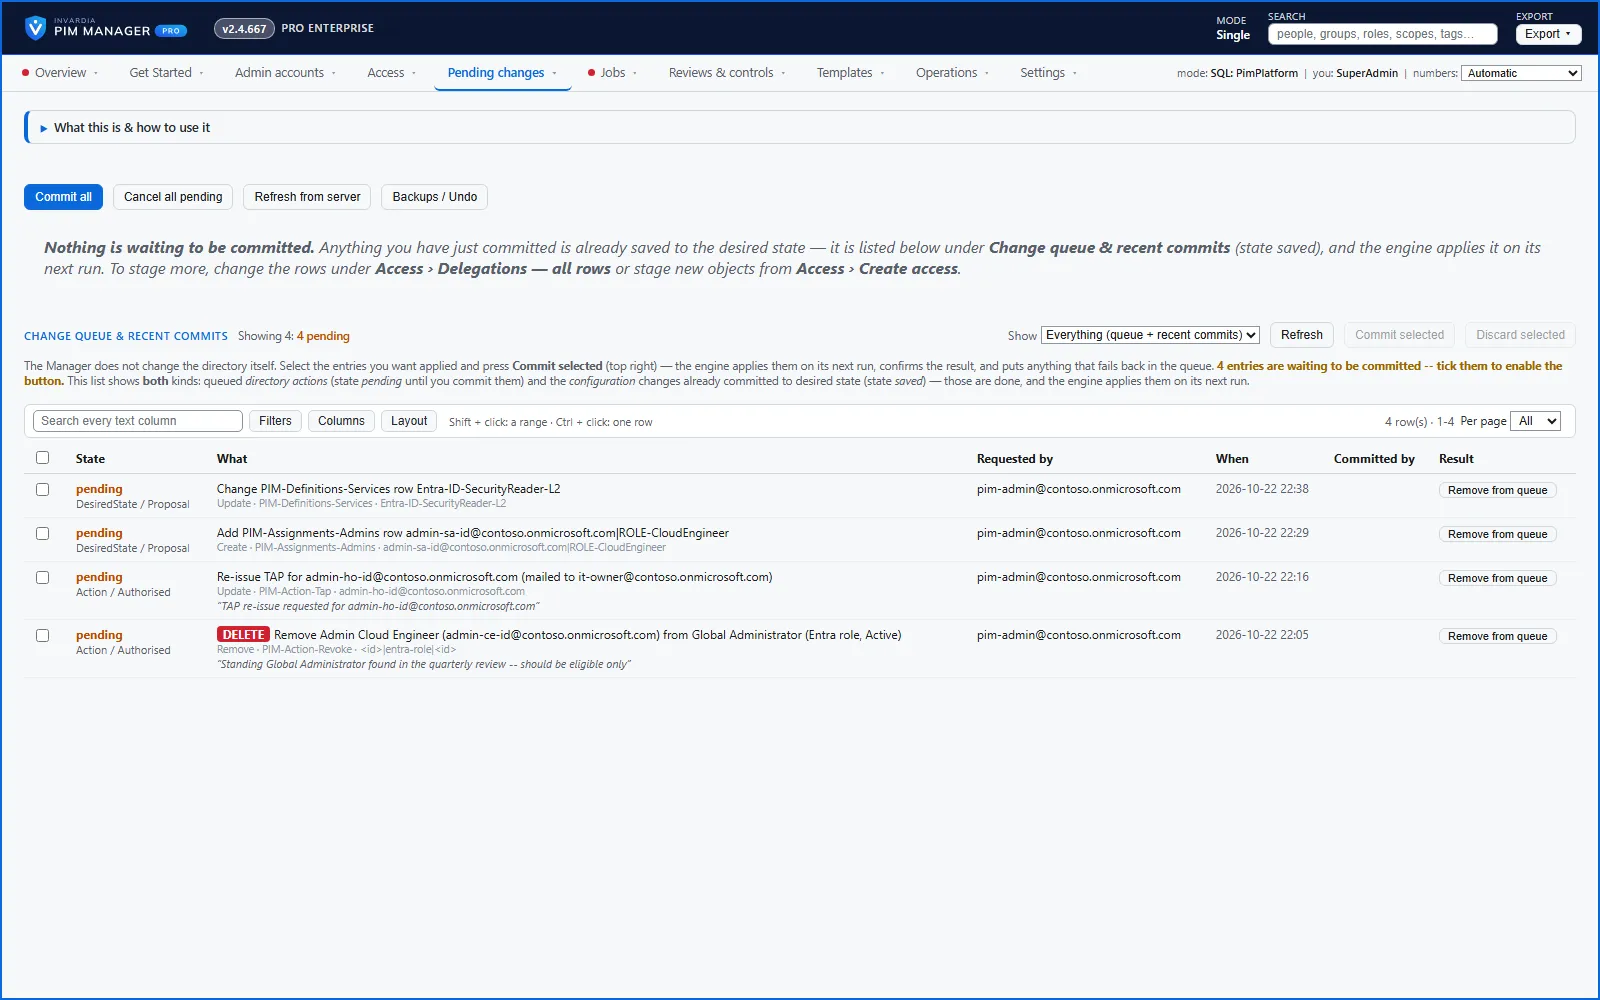
- Open Pending changes > Review & commit queue. The new admin and its role-group memberships are listed.
- Press Commit all.
- On the next engine run (or on the Create on date), the engine creates the account and adds the eligible memberships. At TAP valid from, it creates the pass and mails it.
The Temporary Access Pass
- Where it goes. To the office address you entered. Without one, it goes to the owners of the sponsoring department. When neither exists, the engine creates no pass, changes nothing, and Jobs > Engine logs & errors names the reason.
- What the person does. They sign in with the admin account and the pass, and register their own sign-in methods for the admin account.
- The risk you accept. Anyone who can read that mailbox can sign in as the admin while the pass is valid. Use the person’s work mailbox, not a private one, keep the lifetime short and start it close to the first sign-in.
- An expired pass. It is not replaced automatically. Press Reset TAP on the admin’s row; the reset is queued, you commit it under Pending changes, and the engine deletes the old pass and mails a new one.
Check the result
- Open Admin accounts > Admin accounts & TAP. The account is listed with Status Enabled and the TAP column says enforced.
- Under Temporary Access Pass, press Check on the admin. It reads the live state of the pass; Sends to shows the address it went to.
- If the account is missing, open Jobs > Engine logs & errors and open the latest run’s log.
Undo
- Before you commit: press Cancel and discard in the wizard, or Cancel all pending on Pending changes.
- After the account exists: use Remove from PIM or Delete account on the admin’s row; see How to offboard an admin.
- Undoing the commit under Operations > Commit history & undo takes the admin out of PIM Manager’s records, but the account stays in Microsoft Entra ID: the daily reconcile does not remove or disable admin accounts. See How to undo a commit.
Verified against PIM Manager 3.0.23.3 on Nov 3, 2026Download PDF
← How to onboard a consultantHow to delegate a Power BI workspace →